

Every year I tell myself I will start the Christmas planning early, and every year it somehow turns into a pile of sticky notes, half a list on my phone and a vague memory of what I bought for whom. This time I wanted to try something different: three simple spreads, each with one clear job, that live together in my planner.
None of them are fancy. They are built around what each page needs to track, so they work in a printed planner or a plain bullet journal, with or without stickers. Here is how I am setting them up, and how they fit together.
🎁 Spread One: The Gift List
The gift list is the page that stops me buying the same candle twice. It is the first spread I set up, because the other two lean on it.
I use a simple table with six columns:
- Recipient: who the gift is for.
- Idea: what I am thinking of getting, even if it is only a rough idea.
- Price: what I actually paid, filled in later.
- Bought: a tick box for when it is in the house.
- Wrapped: another tick box.
- Delivered: the last one, for gifts that need posting or handing over.
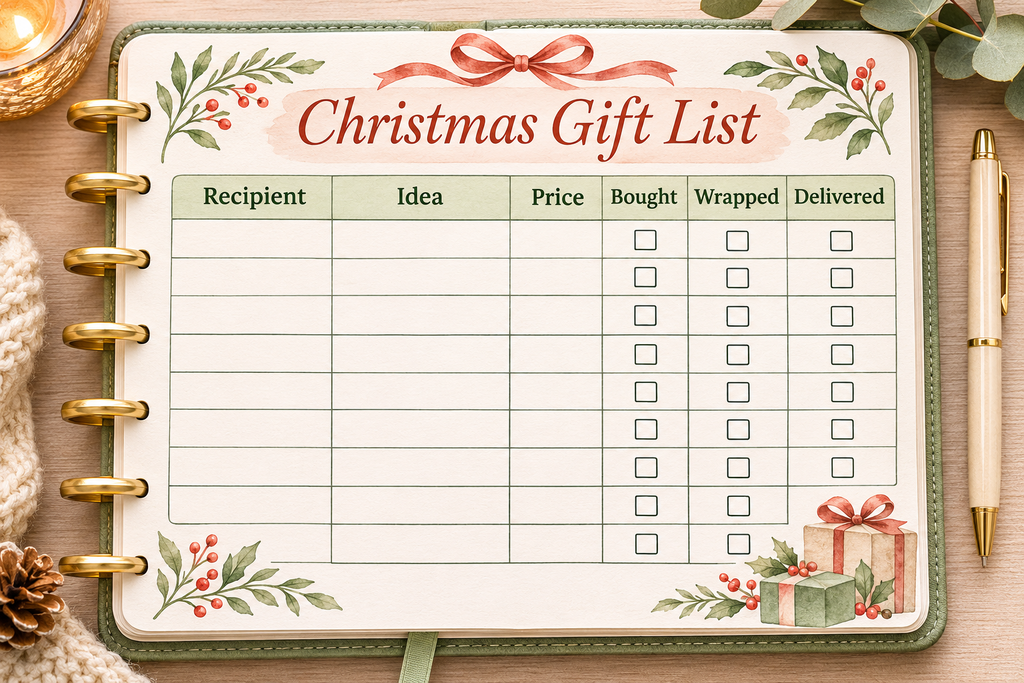
The last three columns are the ones I used to skip, and they are the ones that make the page useful. A gift that is bought but not wrapped is still a job. A gift that is wrapped but not delivered is still a job.
How to draw it
Rule the columns on a single page, or across a two-page spread if you have a long list. Leave a few blank rows at the bottom for the people you forget until mid-December. There are always a few.
If you are new to setting up pages like this, my bullet journal layouts guide covers the basics of ruling and spacing. If you like adding little visual cues, a handful of stickers for ticks or status marks can make the page quicker to scan.
💷 Spread Two: The Budget Page
I will be honest: I used to avoid budget pages because they felt like homework. What changed for me was keeping the page small and specific, rather than trying to track every penny or cent.
The setup has three parts.
- An overall limit. One number at the top, decided before you start shopping.
- Categories. Split the limit into the groups that make sense for you, such as family, friends, colleagues, wrapping and cards, food and drink, and a small “extras” pot.
- Spending against it. Add what you spend as you go, and keep a running total under each category.
A budget page like this is a tracking tool, not a promise. It will not make Christmas cheaper on its own, but it does show you where the money is going while you can still change course.
Keeping it honest
Fill in the gift list first, then copy the price column totals across to the budget page. That way the two spreads agree with each other.
If you like keeping a bigger financial overview in your journal, my post on using a bullet journal to stay on top of finances goes into more depth about tracking in general.
📅 Spread Three: The Countdown Tracker
The countdown is the spread that keeps me moving. It is a weekly timeline that runs from now until Christmas Eve, with each week showing what needs to happen.
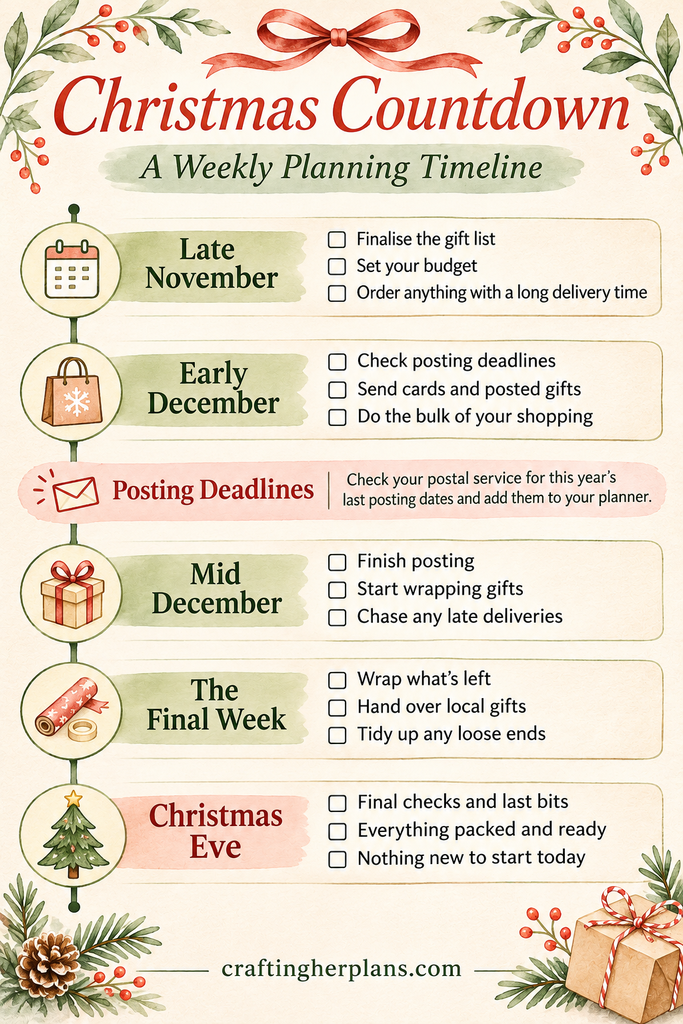
Here is the structure I am using:
- Late November: finalise the gift list, set the budget, order anything that needs a long delivery.
- Early December: check posting deadlines for gifts and cards that need to travel, and do the bulk of the shopping.
- Mid December: finish posting, start wrapping, and chase any late deliveries.
- The final week: wrap what is left, hand over local gifts and tidy up loose ends.
- Christmas Eve: a short checklist for the last bits. Nothing new should start here.
Posting deadlines
The dates that matter most are the last posting dates, and they differ depending on where you are and which service you use. Look up the current dates from your own postal service and write them in as fixed points on the timeline. I put mine in a different colour so they stand out.
Everything else on the countdown can move around them. If you want a refresher on small, quick setups, my five FUNctional spreads you can set up in under ten minutes shows how little time a simple layout takes.
🧩 How the Three Spreads Work Together
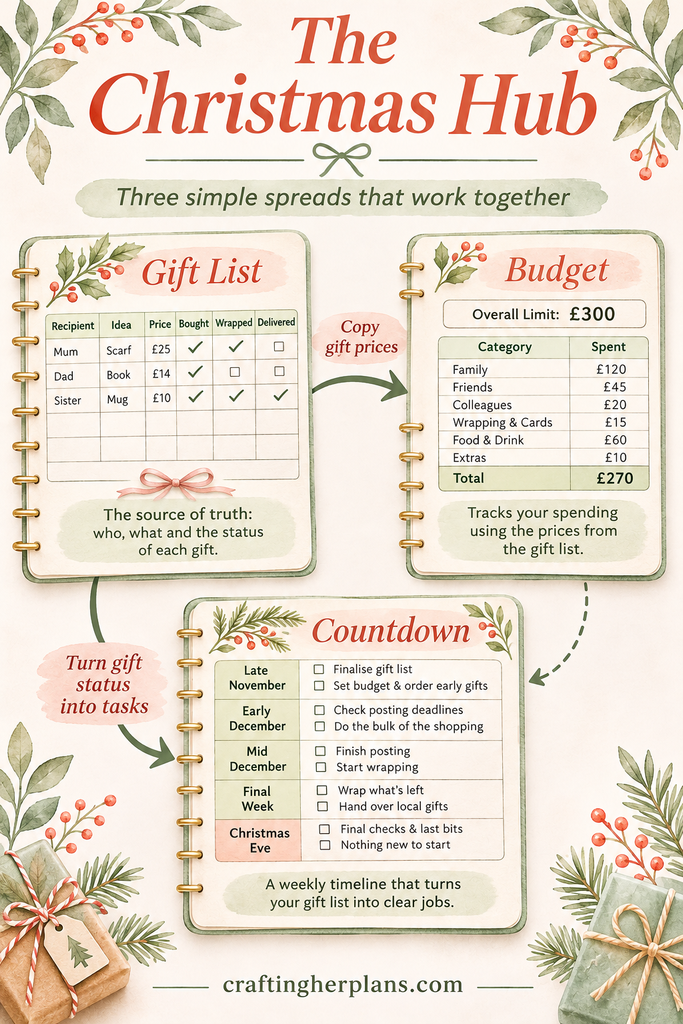
On their own, each page is useful. Together they work as a small Christmas hub.
- The gift list is the source of truth: who, what and the status of each gift.
- The budget takes its numbers from the gift list.
- The countdown turns the status of the gift list into dates and jobs.
When something changes, you only update one page, then follow the thread. If a gift is bought, tick it on the list, add the price, and tick it off the countdown. It sounds fussy written down, but in practice it takes seconds.
Where to put them
I keep all three on adjacent pages, near the front of the December section of my planner. That means one flip of the page gets me everything.
If you want to keep the hub tidy, add a small index line at the start of the section: gift list on page X, budget on page Y, countdown on page Z. It is a small thing, but it saves hunting.
✏️ Setting Them Up in a Bullet Journal
If you are working in a blank notebook, the setup is straightforward. You need a ruler, a fine pen and a bit of patience.
- Decide how many pages you want to give the hub. Three spreads usually take three to four pages.
- Draw the gift list table first, as it is the most structured.
- Add the budget page with the limit and categories.
- Finish with the countdown timeline.
If you are still getting comfortable with the basics, my bullet journal for beginners guide is a gentle place to start, and the guide to lists in your planner or bullet journal has more ideas for list-style pages.
Sticker help
If you like to add a bit of structure with stickers, a functional planner sticker multi-pack has tick boxes, labels and small icons that suit pages like these. They are useful for status marks and deadline flags, and they cut down on time spent drawing. If you want a longer look at how I use stickers this way, my guide to FUNctional sticker spreads covers the whole approach.
🖨️ Or Use a Ready-Made Printable
Not everyone wants to rule pages by hand, and that is completely fine. If you would rather print something and get on with the rest of the season, a ready-made option can save a lot of time.
I made the Cozy Winter & Christmas Planner as a printable for exactly this stretch of the year. It gives you pages you can print at home and slot into a planner, so you can skip the ruler. If you are also hosting friends over the festive period, there is a companion Friendsmas Hosting Planner for that side of things, which I will leave to its own page rather than squeeze in here.
If you are thinking of using a printable, check your planner’s page size first, so everything prints at the right scale. My guide to what size planner you actually need is a good place to check, and notebook size versus planner size explains why the same size label does not always mean the same page.
Whichever route you choose, the three spreads stay the same. The hub is the idea, and the format is up to you.
🌟 Small Habits That Keep the Hub Working
A system only helps if you keep using it. These are the habits I am trying to build.
- One weekly check-in. Pick a day, ideally the same one each week, and update all three spreads in one sitting.
- Write it down straight away. If you buy a gift, tick it off the same day while you remember.
- Keep receipts in one place. I tuck mine into a pocket at the back of the section.
- Leave space. Last-minute gifts happen. Blank rows are not a failure.
- Be kind to yourself. If you miss a week, pick it up the next one. The page is there to help, not to judge.
💛 Final Thoughts
Three small spreads will not plan Christmas for you, but they take a lot of the mental load off by putting everything in one place. The gift list tells you what is happening, the budget shows where the money is going and the countdown tells you when to act.
If you try them, start with the gift list and add the others as you feel ready. Keep it simple, and adjust as you go.